I'm Janimal, happily gainfully employed Momma to a sweet girl. Livin' it up in Atlanta with a great husband and a good job. Sometimes I make stuff and here's my spot to show it off! Life is good, so I'm sharing....

Wednesday, December 29, 2010

Ice Cream Blouse - Thing One & Thing Two!

Some time ago, there was a sewalong for the Ice Cream Dress by Oliver and S. I signed up, bought some fabric, cut it out, then didn't sew the dress. Why? I started to see all the other people's dresses and just fell out of love with the fabric I chose. I just wasn't motivated to get sewing with it.

Recently, I decided it was high time I sewed this pattern. I got out the pieces, and decided the fabric would be better as a shirt, not a dress. And since I was making one, why not make two?

So.....here is Delilah in her Thing One Thing Two Ice Cream blouse!


I think the bunny slippers really complete the outfit, don't you?!


I have had this Dr Seuss fabric (by Robert Kaufman) for a while, not knowing what to do with it. Delilah loves The Cat In The Hat so I was itching to make her something with it. I am thrilled with how it turned out! I made a size 3T which is roomy enough that hopefully it will fit for a while.
Oh, and here's the top that I made from the original fabric choice. I like it very much as a top. I think I would be less in love with it as a dress. Fabric by M'Liss from Hancock Fabrics.


In the works......I am testing a pattern for Oliver and S! I am very excited about it. Their Spring pattern collections looks really fun and I feel so lucky to have an advance copy of one of the patterns. I can't show it to you, as it's not released yet, so here is just a little teeny peek.....

I can't wait to show this garment off.
Have a safe and happy New Year!
Later skaters,
Janimal


Tuesday, December 21, 2010

Delilah Works The Runway

Hello friends!

Delilah's school had a holiday fashion show this year. We were asked to dress our kids in their best and watch them work the runway. I ALMOST sent Delilah in with her Cat in the Hat dress -- because she loves it SO MUCH. Not quite as much as her Muno dress, but close!

Instead, I dressed her in the MusicBox Dress (design by Oliver and S) that I sewed for her using a classic Liberty of London cotton lawn fabric.

Practicing her runway moves:


Delilah wears a 2T right now. I had sewn this dress in the 3T size, so she could wear it when the weather warms up. So it is a tad long. But no matter! The bodice fit perfectly over her turtleneck. She wore it with style and grace and she swished down the red carpet in her silver shoes!

We tried to get a nice picture of D in front of the Christmas tree. She was in a funny mood.


Now here's the supermodel shot. CHEEKBONES!


After the show, Delilah had to field some calls with other modelling offers. It was serious business.


Course, after the show, Delilah really let her hair down. What did they serve those little models backstage anyway?!?!


This pattern was lovely to sew. Oliver and S just has SUCH wonderful children's clothing patterns. Pretty clothing with clear instructions and quality construction. I love it! The Liberty fabric was purchased at Purl Soho.

::Dear modelling scouts - Delilah is going to focus on her education for right now. Thanks anyway!::

Thanks for stopping by!

Happy Holidays!

Janimal


Monday, December 20, 2010

Winner Winner, Chicken Dinner!

My apologies for posting this a bit late. I randomly selected a winner for the giveaway and picked....drumroll please.....

Carolina Girl Mommy!

Carolina Girl Mommy said...
I was thinking Buttercup bag when I saw the fabric... then read you had thought that, too... so if I win that may be what this fabric is destined for :)

Desiree


So congratulations Desiree - I hope you enjoy the fabric and make a pretty bag!

Thanks to all who stopped by and entered. Happy Holidays!

Janimal

Monday, December 13, 2010

GIVEAWAY POST!

Hi there! It's giveaway day!

I am giving away fabric for the big Sew, Mama, Sew! giveaway day. Fabric I really really really like. I just have too many projects on my list that this lovely yard of goodness would sit and sit - and it's too pretty for that!

Want to see it?

Innocent Crush by Anna Maria Horner in Woodcut - HOME DEC WEIGHT! A full yard of it! Purchased from that fabulous store, Whipstitch Fabrics.


I think this would make a fabulous Tote Bag. And probably would be enough left for a Buttercup Bag. And how about a matching business card/giftcard holder?! Oh there are so many projects this would be lovely as!

So please leave a comment to enter. That's it. Any comment! I'll pick a winner at random on December 17th. I hope that you'll check out the rest of my blog and perhaps come by to visit again sometime.

Happy Happy!

Janimal

http://www.sewmamasew.com/blog2/december2010/GiveawayDayButton.jpg

Friday, December 10, 2010

Cat In The Hat Dress

I like to make dresses for you!
I like to make them in the zoo!
I like to take your picture too!
I like to sew, oh yes I do!

OK - so that wasn't great, but who can compare to the amazing Dr Seuss?!?!
Delilah is a fan:


Delilah is decked out in a dress (pattern Madison by Bonnie Blue Designs) made with love by her Momma (ahem, me) from whimsical Dr Seuss Cat in the Hat print from Robert Kaufman.

Totally cute, right?!

I think the simple dress pattern without any other embellishment shows off the fabric, but doesn't overpower the kid wearing it.

When I first saw the Dr Seuss fabric was coming, I preordered some, not knowing WHAT to do with it. Then I received an invitation to a Dr Seuss art exhibit at a local gallery! PERFECT!

Our little lady struck a pose at the entrance to the gallery. Classy!


Delilah was a big hit at the gallery, of course! She was very well behaved in a bouncy two year old sort of way, and she was noticed for the dress, but adored for her cuteness. (Where this kid got those luscious eyelashes I have no idea.) The art, by the way was AMAZING. Dr Seuss, Theodor Geisel, was one talented dude.

We managed to choose a small Dr Seuss print to purchase and bring home. Gosh we did feel important buying ART from a GALLERY! Like grownup people! All that fanciness was a lot for us, so we departed the gallery in our finery and went out for burgers and fries.

Thanks for stopping by,


Later skater,


Janimal

Texas Monkey

Tuesday, December 7, 2010

Felt Birdy Toy Tutorial

BIRDY TUTORIAL TODAY!


Hello friends! While visiting my Father-in-law for Thanksgiving, I whipped up a little birdy, handstitched using wool felt. The night before our flight I threw a few pieces of felt in my suitcase and during a naptime, this is what I came up with!


Photography was all done indoors in bad lighting as quickly as possible so I could get this finished.

First: I drew a birdy on some paper! You can download this drawing HERE.


Ok, this step is obvious, right, cut it out!


Then use that piece to cut pieces from wool felt. I had brown and pink felt handy - have fun picking colors.


For the beak, add about a quarter inch tab so you have room to stitch it on later.


Ok, once all the felt is cut, we can sew!


Place the wool felt birdy pieces so you have two pieces facing opposite directions, and layout the other felt pieces so they mirror each other.


Choose whatever color you like embroidery floss and straight stitch on a wing. I used a slightly darker pink so the stitches would show and be decorative.


Once I started stitching, I decided a few rows of stitching would be pretty, so went around each wing three times. Totally optional to do whatever you want here.


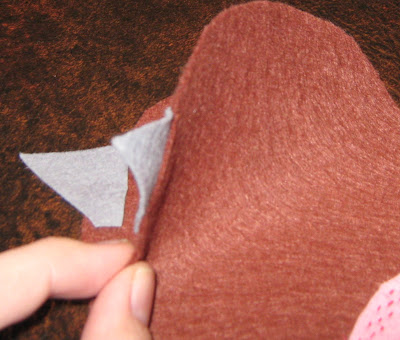
Next, the beak needs to be sewn on. Here is a pic of the WRONG side of the birdy, so you can see how the beak is stitched on. I used brown to MATCH the birdy this time, so the stitches wouldn't show up as much on the outside.


Stitch the beak on both birdy pieces, making sure they line up and are still mirroring each other.


Now for the eyes. Using embroidery thread, I pulled the needle from the middle of the circle, and did stitches out from there, making little stars in the center of the circles for eyes.


Instead of felt, you could use buttons for eyes, assuming the toy is for a child old enough where they won't be a choking hazard of course!


I almost didn't give this birdy any legs. But thought better of it and cut a couple legs out of felt, and sewed them to the bottom of one birdy piece, with the matching brown thread, just like I used for the beak. The legs were too long so I trimmed them AFTER sewing them on.


Ok, time to stitch the birdy together. START with the beak. If I had grey matching thread, I would have used it here. But alas that wasn't the case so I used black. Use a whipstitch (great tutorial to whipstitch here). Once the beaks are sewn together, stuff just the beak. If you don't, it can be hard to get stuffing in the beak properly once the birdy is sewn together.


Keep on whipstitching around the birdy, leaving about a two inch opening across the top back of the bird.


Then enlist a little helper to help finish the stuffing! Delilah recruited her Daddy to help to, so this was a whole family affair. She put little tiny bits of stuffing in the birdy at a time. So it took a while. But we didn't mind, this birdy was a labor of love!


Hey - we stuffed a bird on Thanksgiving - perfect! Once all stuffed up, sew him closed continuing that whipstitch.

Now, those feet! This birdy's feet need some attention!


A few snips with the scissors and VOILA!


So there you have it! A soft felt birdy to love.


Hope you liked the birdy tutorial. It was quite relaxing to sit and handsew him up while Delilah slept, and was a joy to have her be my little helper to get him all stuffed and finished. I hope if you make one you have as much fun as we did.


Happy Holidays,


Janimal


Texas Monkey

Monday, December 6, 2010

Top From Sew Liberated Book

Hello friends! I am working on a tutorial for you - just need to get my little template scanned and uploaded. In the meantime, let me show you a little something I just sewed up for Delilah and the pattern/book it came from!


My cooperative little model even struck a pose for me! Right before bedtime too!
(Fabric is by Kokka - and now I see the the LUCKY word upside down, but the PEACE word is right side up. I think perhaps I should have made the LUCKY word right side up instead - it seems more noticeable. Hmmm...the back is the same as the front, so perhaps I'll turn it around and see the placement there. It's still oriented that way but perhaps the PEACE will be more centered than LUCKY - ah well!)

This hippy little peasant top was SO fast to sew up. I finished it and couldn't wait to see how it fit Delilah so put it on right away. Next time she wears it probably won't be with her fleecy cupcake pajama bottoms.

The pattern is from this book:
Sew Liberated by Meg McElwee.


(wow, bad flash from my camera on the book)

My fabulous husband bought me this book from Whipstitch Fabrics (he knows I love that store) for Hanukkah. What a good boy!

Ok, one more picture of her gorgeousness...


This top pattern actually is included in sizes for Mom AND daughter. Is it bad I am tempted to be all matchy matchy with my kid?!?! I really like the gathered detail on the arm. It was SO easy and fast to make. It gets me excited to try other patterns from the book - like the bags or the cover skirt.


Thanks for stopping by, and HAPPY HOLIDAYS!

Janimal

Edit: I made the Small, which was listed as size 2-3, with the description saying they fit large to be grown into. This was apparently an errata and the Medium is actually 2-3. So this wasn't a very big shirt. Next time I'll make the Medium!


Making


Texas Monkeymake it wear it