I'm Janimal, happily gainfully employed Momma to a sweet girl. Livin' it up in Atlanta with a great husband and a good job. Sometimes I make stuff and here's my spot to show it off! Life is good, so I'm sharing....
Showing posts with label wool felt project. Show all posts

Friday, February 4, 2011

Felt Flower Hairclip Tutorial

Hi there!

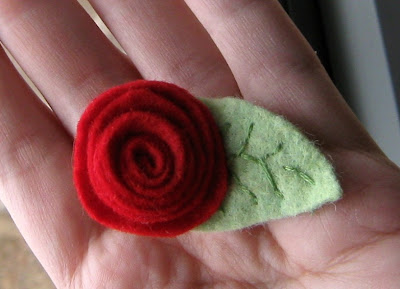
I have a tutorial today! A pretty flower hairclip tutorial!

I love the felt rose hairclip tute on PurlSoho.com here. I actually have made their version of a felt rose and worn it myself as a pin.
The felt rose I am going to show you is a little smaller than the Purl version. I found that on Delilah's fine hair, a heavy hairclip doesn't stay in place as well. This little flower is smaller and lighter, and very easy to do. It does require a needle and thread, but I suppose it really could be done with glue.

So away we go!

Start off with a circle of wool felt. About 2' in diameter.


Cut the circle around in a kind of corkscrew manner. About a quarter inch thick curl.


At this point, thread a needle with embroidery floss. I like to use a double thickness and tie the end with a nice thick knot.


Take the outermost point and roll it up a little. Then push the threaded needle right through the back.
Push the needle back through at a different angle, holding the rolled piece together. Then keep rolling.


After you've wrapped the rose up a little more, do a few more stitches in the back of the flower, from a few different angles, holding it all together.


When you get to the end, put the flat center circle flat on the back and sew or glue it in place.


Ok! Flower done! Now let's have a leaf on our clip!
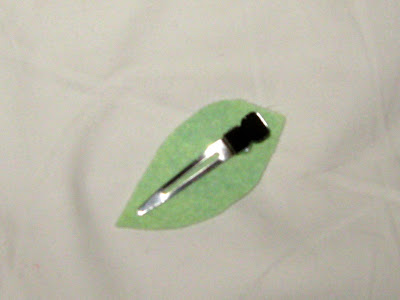
Cut a leaf shape just bigger than your clip.


You can simply glue the leaf in place, glue the flower on top, and be done!
I wanted to add some detail to the leaf and decided to embroider them with darker shade of green thread. You can stitch the detail on and then glue to leaf to the clip, but I thought I would use those stitches to keep the leaf firmly attached to the clip instead of using glue. So as I sewed the detail on the front (top) of the leaf, I wound the needle through and around the clip, holding it in place.


Eventually the leaf was attached to the clip by my stitches and it had a nice detail on top.


Now all that is left, is putting it together!

I suppose I could have glued the rose to the leaf, but I decided to stitch it together.

I also did a few more stitches through the hole in the clip, for a little more reinforcement.

Now, the flower and leaf are all stitched together to the clip. But I think as a finishing touch, I will add a little glue over the stitches to give it a little extra reinforcement. And....next time I do this, I might wrap some ribbon over the top of the clip first, so you don't see as much of the metal clip. A small detail as you don't really see it.
And there you have it! A cute felt flower clip for a cute girl. She wasn't available to model this when I finished it, so here is a bad picture of the clip in my hair. Holy camera flash Batman!
It will TOTALLY be cuter on Delilah!
In other news.....I finished my camo dress! Well, I still have to sew the belt, but the dress itself is finished. And it fits! Well, sort of. I'll make some adjustments to the pattern for next time. I'll tell you all about that in an upcoming post.

Take care y'all!

Janimal


Fantabulous Friday!


Texas Monkey

Tuesday, December 7, 2010

Felt Birdy Toy Tutorial

BIRDY TUTORIAL TODAY!


Hello friends! While visiting my Father-in-law for Thanksgiving, I whipped up a little birdy, handstitched using wool felt. The night before our flight I threw a few pieces of felt in my suitcase and during a naptime, this is what I came up with!


Photography was all done indoors in bad lighting as quickly as possible so I could get this finished.

First: I drew a birdy on some paper! You can download this drawing HERE.


Ok, this step is obvious, right, cut it out!


Then use that piece to cut pieces from wool felt. I had brown and pink felt handy - have fun picking colors.


For the beak, add about a quarter inch tab so you have room to stitch it on later.


Ok, once all the felt is cut, we can sew!


Place the wool felt birdy pieces so you have two pieces facing opposite directions, and layout the other felt pieces so they mirror each other.


Choose whatever color you like embroidery floss and straight stitch on a wing. I used a slightly darker pink so the stitches would show and be decorative.


Once I started stitching, I decided a few rows of stitching would be pretty, so went around each wing three times. Totally optional to do whatever you want here.


Next, the beak needs to be sewn on. Here is a pic of the WRONG side of the birdy, so you can see how the beak is stitched on. I used brown to MATCH the birdy this time, so the stitches wouldn't show up as much on the outside.


Stitch the beak on both birdy pieces, making sure they line up and are still mirroring each other.


Now for the eyes. Using embroidery thread, I pulled the needle from the middle of the circle, and did stitches out from there, making little stars in the center of the circles for eyes.


Instead of felt, you could use buttons for eyes, assuming the toy is for a child old enough where they won't be a choking hazard of course!


I almost didn't give this birdy any legs. But thought better of it and cut a couple legs out of felt, and sewed them to the bottom of one birdy piece, with the matching brown thread, just like I used for the beak. The legs were too long so I trimmed them AFTER sewing them on.


Ok, time to stitch the birdy together. START with the beak. If I had grey matching thread, I would have used it here. But alas that wasn't the case so I used black. Use a whipstitch (great tutorial to whipstitch here). Once the beaks are sewn together, stuff just the beak. If you don't, it can be hard to get stuffing in the beak properly once the birdy is sewn together.


Keep on whipstitching around the birdy, leaving about a two inch opening across the top back of the bird.


Then enlist a little helper to help finish the stuffing! Delilah recruited her Daddy to help to, so this was a whole family affair. She put little tiny bits of stuffing in the birdy at a time. So it took a while. But we didn't mind, this birdy was a labor of love!


Hey - we stuffed a bird on Thanksgiving - perfect! Once all stuffed up, sew him closed continuing that whipstitch.

Now, those feet! This birdy's feet need some attention!


A few snips with the scissors and VOILA!


So there you have it! A soft felt birdy to love.


Hope you liked the birdy tutorial. It was quite relaxing to sit and handsew him up while Delilah slept, and was a joy to have her be my little helper to get him all stuffed and finished. I hope if you make one you have as much fun as we did.


Happy Holidays,


Janimal


Texas Monkey