I'm Janimal, happily gainfully employed Momma to a sweet girl. Livin' it up in Atlanta with a great husband and a good job. Sometimes I make stuff and here's my spot to show it off! Life is good, so I'm sharing....

Tuesday, September 28, 2010

Adventures At MoMA

Recently, I had the lovely pleasure of spending a weekend in NYC with my two brothers and nephew.

I have to share this funny little experience from MoMa.


I backed up to take a picture of my brother as he checked out this huge hammock looking art installation.


I looked behind me to make sure I wasn't going to run into anything. You know, like a giant stack of bales of hay.


Ha! The haystack was in the other room. All clear.
The security guard yelled. "MA'AM! MA'AM! STOP!" I froze of course. Turned around. Nothing there. What up dude? He tells me "That's art" And I am puzzled. Then I look down. At this.


Uh huh. A blotch of spray paint on the floor. Here is the plaque on the wall.


Yep - a 42 year old blotch of spray paint. Conceptual art by the very important Lawrence Weiner. (I had to Google him) Sorry security dude.

So I guess you can tell that I don't "get" some of this modern art stuff. But maybe I should be looking at the floor of my garage differently, huh?

Despite my near run in with the paint splotch art, I really enjoyed MoMA and there was so much awesome artwork that I was able to appreciate. Here I am doing my own mandolin impression with Picasso.


My photos don't come anywhere near doing justice to these beautiful art pieces. Here is a gorgeous Monet. I could have stayed in this room just looking at this for hours.


One of the cool things about going to the museum, is taking in others' reactions to the art. I really like this pic of my two brothers. They are such different people, and I like the contrast of one dressed darkly crouching and smiling, and big bro standing in his light outfit looking thoughtful. Both checking out the same piece.


Thanks MoMa for a fun afternoon,


My brothers and I live in three very different parts of the country. We have very different lives. It had been WAY too long since we had all been together, and NYC was a fun backdrop for our 48 hours together.
(I think 2 days is the perfect amount of time to visit with family. Long enough to love each other and refresh those familial bonds, but not too long where you drive each other crazy the way only siblings and family peeps can)
Thanks for stopping by. I have some sewing stuff to post very soon. :-)
-Janimal

Friday, September 24, 2010

Enclosed Ribbon Hem

Before I say anything - let me just say I am floating on air this morning. In a fabulous mood. Giddy with excitement.

What is giving me this joy?

EDITED: Delilah hit a toddler milestone, that we high fived over all morning. And I wrote a funny little bloggy bit about it. But have reconsidered that bit of detail. I have to remember that anything written on the internet is there for forever. And twelve year old Delilah might not be all that thrilled at me writing about two year old Delilah's milestones. So, moms of toddlers out there, just think about the joy you have when you kid hits a milestone, and that's me, today. Over the moon at my little miracle's accomplishments. The kind of thing only another parent could truly appreciate. And to future older Delilah - I love you kid. This was a good morning!

So - now that you (edit) DON'T have your dose of TMI - let's talk sewing.


Here is pictures of some simple cropped summer capri pants I made for Delilah, using a technique I learned from childrens clothing pattern designer Oliver and S for an enclosed ribbon hem.


We were having fun in the shade of our driveway blowing bubbles. What you can't see in this picture is that Delilah and I wore matching Foofa shirts that day. We looked pretty silly but this kid was delighted that Mommy matched. Unfortunately, my pants weren't as cute.


Using a ribbon to finish a hem is ridiculously easy. The result is nice and clean on the inside, and is as cute as you want on the outside. These pants were actually from a pattern I had for simple shorts I just lengthened the pattern to make pants, and added a wide dotted ribbon. Nice and light and airy in seersucker for the hot Atlanta summer, and still protecting her skin from sun and bugs. (The pattern was purchased on Etsy from this seller, and is just one pattern piece and SO easy.)


(If you want to try a ribbon encased hem, the technique is explained in this FREE simple skirt tutorial on the Oliver and S blog.) I would show you, but honestly the directions are really that good on their own!


Speaking of Oliver and S, one of my favorite FlickR groups is the Oliver and S patterns group. Let me just say, their patterns are awesome. The instructions are SO clear. If you have been hesitant to sew using a pattern, these are the way to go. I think patterns can be intimidating to many talented but inexperienced sewists. But I really think O & S brings them within reach.

Happy Friday everyone!


Tidy Mom I'm Lovin It Fridays


Thursday, September 23, 2010

Get Ready For The Holidays!

It's September already?!?! How did that sneak up on me so fast?!? Time to kick holiday gift crafting/sewing into gear!

At a local sewing guild meeting, we shared "30 minute gifts". So I made a few giftcard holders that can double as business card holders for the recipient later. A gift in a gift.


(My easy-peasy tutorial to make these is HERE.)

I have plans to get together with a friend and make some reusable fabric giftbags. My friend found THIS TUTORIAL to make some drawstring bags that looks pretty cool to follow.


Other gifts to make? Well, I just spent a weekend in NYC hanging out with my cool brothers and even cooler nephew. I got to shop at the fabulous Purl Soho and bought this book (that was recently spotlighted on their blog).


Oh the dollies in my future! One of the doll patterns was published over at Martha Stewart, so I'll make that dolly up, and post my pictures and the link hopefully within a week.


And...I will probably post some of my NYC pics. So there's your warning - non-crafty posts ahead. With my cute brothers in them.

Later skaters,
Janimal
giveaways


Tidy Mom I'm Lovin It Fridays

Monday, September 13, 2010

Front Yard Cemetery Decorations

It's almost HALLOWEEN!
Oh yeah!
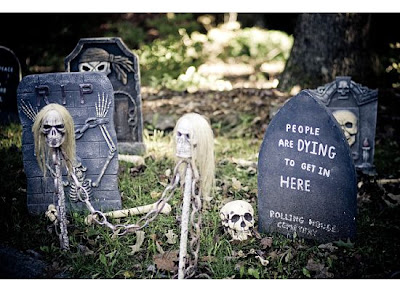
Which means it's time for a spooky neighborhood cemetery in our yard. Each year we add to our decor and it gets spookier and spookier. Here are some pics from last year.


(The men in our cul-de-sac all have their own headstone. Al is a neighbor, Larry is my husband, and our friends get a good chuckle out of his.)


That back headstone for our other neighbor reads "Here lies MR POOLE - fell off a stool, now HE'S A GHOUL"

These headstones are the cheap foam ones you can buy at your local drugstore for a few bucks a piece. I simply turned some around and painted on the backs with white acrylic paint. They have held up remarkably well to the elements and the weathering effect makes it just creepier! This year I may add some of the neighborhood ladies to the cemetery - I just have to work out some rhymes.
There are also bright orange twinkle lights wrapped around our trees and throughout our bushes. Bring on the trick or treaters!
Happy Halloween everyone!

Making
Visit thecsiproject.com

Friday, September 10, 2010

Changing The Hat

Hello Blogland! Today I am happy to show you how I customized a hat for my girly girl.

Recently, I found this hat at Kohls. Armed with my 30% off coupon, it was mine at a bargain price.


Although I wasn't a big fan of the black buckle detail, I liked the texture of the fabric, and I thought Delilah would look adorable in that shape hat -- if I fixed it up a bit.

Here's Delilah chilling out waiting for a real photographer to take her picture, sporting her transformed hat, now featuring a flower that matches her shirt. Eating Cheerios of course.


The best part - the flower is attached with Velcro, so her hat can be customized for other outfits!
The shirt and main hat fabric is Travel England in turquoise by Kokka, with a Michael Miller Graceful Vines print for the lining and contrast in the flower. Both purchased from the lovely people at Some Art Fabric. I made the pants too. Nice and soft pique knit. Next time I may make some for me!

(My tutorial to make this simple shirt is HERE)

Notice the hat has a center covered button detail? HA! That's not a button. Let me me show you how......

First, I made a fabric flower - you can see my tutorial on that here. Instead of a button for the center, I decided to make a covered fabric button for the center. Except I had no fabric covered button supplies. I improvised. You can too!


Supplies:
Fabric flower, cardboard cut into a circle, small piece of batting slightly larger than the cardboard circle, fabric square, and strong glue.


Glue the cardboard to the batting.


Wrap the fabric around the circle, using dabs of glue to hold in place on the back.


Let the center button dry before gluing to the center of the fabric circle.


The black buckle detail on the hat was easily picked off.
I sewed velcro the back of the flower, and to the hat, so this flower comes off to easily customize the hat for other outfits.


Thanks for stopping by. Your feedback is so lovely.

- Janimal


make it wear it

Tuesday, September 7, 2010

My Little Teapot Dress!

SO sorry to be gone so long! Life has just been busy and blogging hasn't been a priority, although I have still been creating and sewing and have lots to share!

Check out Delilah modelling her teapot dress!


Honestly, I thought about waiting until I could style D up in the dress and take her picture under natural light in the pretty outdoors. But I couldn't resist sharing this silly photo. I'm amused by Delilah's unimpressed facial expression. I like that she gave me a partial little teapot spout with her arm, and that her other arm seems to have magically disappeared altogether. OF COURSE she is enjoying a sippy of milk and some Cheerios because that's what she asks for constantly. I snapped a couple quick pictures, and put the camera down. So this picture also reminds me of the fun tickles and laughs we had as I chased her to take this dress off!

(Once it was off, Delilah grabbed the dress from my arms and happily yelled MY DRESS! followed by a HUGE giggle and that was an awesome moment as a Mom and a sewist.)

Here's the back view.
I had just sewn on the last button. And see below - you can still see the fabric marker line that I had drawn to make sure my buttons were straight.


This simple dress was the perfect choice for me to show off some fun fabric. This is Bermuda Metro Cafe by Robert Kaufman purchased at Whipstitch Fabrics on Etsy. Whipstitch is local to me but I still haven't made it into the shop. One of these days I will visit the shop and am afraid of the fabric buying frenzy that may ensue.

For Delilah I have figured out that I need to make up patterns in a 3T, but adjust the length. Which makes me a bit nervous as I am no pro at adjustments. I am thrilled that I seem to have gotten the length right on this dress.

For sure I will be making more little tank dresses for Delilah to show off some of my favorite fabrics. And my favorite little girl.

Sorry to have been away - I'll try to post more often but you know blogging just doesn't rank as high on my activities list as, say, sing Ring Around The Rosey a gazillion times with my hilarious child. I trust y'all understand!


BCD 125


make it wear it