I'm Janimal, happily gainfully employed Momma to a sweet girl. Livin' it up in Atlanta with a great husband and a good job. Sometimes I make stuff and here's my spot to show it off! Life is good, so I'm sharing....

Monday, February 28, 2011

Sailboat Top

I am continuing my love affair with Oliver and S patterns. I think I may just sew all of them!

My latest is the sailboat shirt. For Delilah (of course). It's a sweet simple top, with a topstitching detail at the yoke and hem, with buttons on the shoulders.


Delilah is sporting her comfy pink sweatpants. This top will definitely go better with some different pants or a skirt. But when I make something for her, I just want her to wear it, right away, NOW! So I pulled this over her head right away. Well, and I want to make a couple more of these for her for the Spring/Summer, and I had to make sure it fit before going off to cut up more fabric.

Ok - I have WAAAAAY too many pictures of her making this funny face.


This kid just loves to pull the funny face. I suppose we should stop laughing when she does it.


These action shot pics let me know she can move and play in the top -- success!


A girl's got to move and groove!


So I can now make some of these tops confident that Delilah can both look cute, AND be comfortable playing. Woohoo!

Although Delilah seems to like her new shirt, she didn't feel like her ensemble was complete. So she went indoors to accessorize.


The girl likes her jewelry! The fabric I used for this top is Frippery by Andover Fabrics.


And...in other Oliver & S news, Liesl, the talented designer behind Oliver and S, has designed some GROWNUP patterns! Sold under the brand "Lisette" for Simplicity. The O&S patterns have such tremendous instructions, and are SUCH a pleasure to sew with. That I could have patterns for myself with the same quality of design and instruction is just thrilling!

If you have any interest in women's clothing patterns with terrific instructions, these are for you. And I say that without even seeing them yet -- that's how confident I am after working with Oliver and S patterns.

Later this week I will post my tutorial for my quadruple stitched baby taggy blanket. So please stop back by!


Happy Stitching!

Janimal


Texas Monkey

Wednesday, February 23, 2011

CAMO DRESS!!! Can you see me?!

I've been talking about the "camo dress" for so long, it's about time I unveiled the thing.

Drumroll please......


Now that you're blind from the glare off my pasty legs, let's talk about the dress! This is the Socialite Dress pattern from Anna Maria Horner. I chose camo fabric from J&O fabrics as my first run through as a sort of funky muslin to check the fit. I'm a big fan of muslins being wearable if they work out - and am pleased to say I wore this camo dress to brunch last weekend!
I have a pair of stilletto knee high lace up suede boots that I think are PERFECT with this dress - but not for a family brunch outing.

Here's a headless shot -- it's all about the dress (and my straggly hair - oy!)


I could totally win a game of hide and seek in my camo dress now.
I really like that this dress has pockets. And they were totally easy to sew in. Swear!


I'm sorry I forgot to get a picture of the back of the dress. Taking a picture of my butt just wasn't in my mind -- you understand!

This pattern has no zips or buttons to sew, the dress just pulls on overhead. It can be worn with or without a belt but honestly without a belt I think it looks a bit tentlike. I sewed myself a medium, and it fits. But for the next run through, I think I will make the top bigger and the lower part smaller. It's a bit more snug in the bust than would be ideal. This dress was pretty easy to put together. I would recommend it for beginners. And I'll be making it again.

So there you have it. What do you think? Chic or scary?!

Later skaters,
Janimal

P.S.
Oh, I have a tutorial to post for my quadruple stitched taggy blankets, and another Oliver & S pattern complete to show off. Come back soon!

Texas Monkey

Friday, February 18, 2011

Uncooperative Model

So I tried to take a few shots of Delilah wearing an Ice Cream Blouse I made her. She was not a cooperative model.

But still is really cute!

I tried to think of a funny caption for this one...but really had a hard time. That's a safety gate - we have the living room childproofed and gated off. So the best caption I got was.

"Let me in!"

Can you think of a better one?


I don't even know what she's eating in this next photo. Hope it was something healthy.


In this next one, you can see her cute pigtails. I am SO GLAD this kid is now liking wearing pigtails because without them her hair is such a little mullet.


This shirt actually was cut to be a dress, and i just didn't add the bottom panel and made it a shirt. So it's a bit long, tunic length. But hey, that means she can wear it a little while, right? I swear this kid is growing SO fast.

But she'll always be my sweet baby.

Awwwwww.

Happy happy!

Janimal

P.S.
Pattern is the Ice Cream Dress by Oliver and S. Fabric by M'Liss from
Hancocks.

Thursday, February 10, 2011

A HandMade Tie

Ever been to the Purl Soho website?!?! Purl Soho is a fabulous store in NYC, which has a lovely online shop and fabulous blog with tons of cool projects.

There is a great tutorial on their blog to make ties for both men and smaller ones for boys. Check it out HERE.

Here is my version of the men's tie.


That's voile fabric from the Innocent Crush line, by Anna Maria Horner. I just fell in love with that print when I saw it at Whipstitch Fabrics.


I like the fabric so much, I bought a few more yards so I could make Delilah a dress to match.

Forgive the knot. I did it myself, and I'm not experienced when it comes to tying men's ties!

Perhaps a tie is one of those things you should show off actually being WORN on a person! So I need to get this around my handsome husband's neck to really show it off.

I just think a little girl dress with a matching tie for Daddy will be SO cute. Perhaps an ensemble that needs to be ready for Father's Day? That gives me plenty of time. For my next version, I think I will widen the pattern a little and make a more traditional wider tie. It was mostly handstitching and that can be quite soothing to do while relaxing on the couch in front of the TV.

Now - full disclosure -- I saw the tutorial on the Purl Soho blog and have had it on my "to try" list for a while. I signed up for a class at Whipstitch Fabrics to make a tie, and lo and behold, we used the same pattern and instructions. So I had some great in real life instruction to make this tie. This was my first time taking a class at Whipstitch, if you are in the Atlanta area, you're in luck because the classes are nice and small with quality instruction. If you are out of the area, I think this particular tutorial from Purl Bee is really well written so still go for it!
Happy Stitching y'all!
Janimal


make it wear it


untitled

Texas Monkey

Monday, February 7, 2011

Modelling Post

Gorgeous Delilah sat still long enough for me to put her gorgeous curls up into pigtails. And graciously agreed to model her pretty Sunday Brunch Jacket (previously posted the jacket HERE).


I had toyed with the idea of sewing a cuff on the bottom of her jeans with matching fabric. Hmmmm. I had really liked this jacket on the hanger when I finished it, but I must say, it looks even better on my cutiepie model. Not that I could be biased at all.

You know how in catalogs the models tend to be looking off camera at something? Well, here's Delilah's catalog shot....


And well, since it's almost Valentines Day -- KISSES!


Delilah wore this jacket to Sunday Brunch! What it was made for! Then a matinee performance of The Wizard Of Oz, which was wonderful.

The Sunday Brunch Jacket pattern is by Oliver and S. The fabric is a soft corduroy Nest by Valori Wells, purchased at Whipstitch Fabrics.

Thanks for stopping by! One of these days, I promise to show you the finished camo dress. I haven't managed to figure out how to wear it - I'm not good at accessorizing myself.
I have a few other finished projects too, so hopefully there is at least one more blog post for this week. I hope you'll stop back by.

Take care,
Janimal


Texas Monkey

Friday, February 4, 2011

Felt Flower Hairclip Tutorial

Hi there!

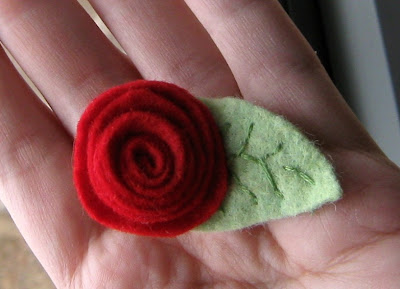
I have a tutorial today! A pretty flower hairclip tutorial!

I love the felt rose hairclip tute on PurlSoho.com here. I actually have made their version of a felt rose and worn it myself as a pin.
The felt rose I am going to show you is a little smaller than the Purl version. I found that on Delilah's fine hair, a heavy hairclip doesn't stay in place as well. This little flower is smaller and lighter, and very easy to do. It does require a needle and thread, but I suppose it really could be done with glue.

So away we go!

Start off with a circle of wool felt. About 2' in diameter.


Cut the circle around in a kind of corkscrew manner. About a quarter inch thick curl.


At this point, thread a needle with embroidery floss. I like to use a double thickness and tie the end with a nice thick knot.


Take the outermost point and roll it up a little. Then push the threaded needle right through the back.
Push the needle back through at a different angle, holding the rolled piece together. Then keep rolling.


After you've wrapped the rose up a little more, do a few more stitches in the back of the flower, from a few different angles, holding it all together.


When you get to the end, put the flat center circle flat on the back and sew or glue it in place.


Ok! Flower done! Now let's have a leaf on our clip!
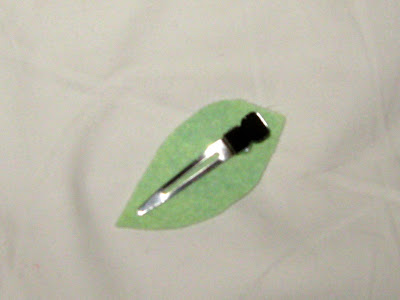
Cut a leaf shape just bigger than your clip.


You can simply glue the leaf in place, glue the flower on top, and be done!
I wanted to add some detail to the leaf and decided to embroider them with darker shade of green thread. You can stitch the detail on and then glue to leaf to the clip, but I thought I would use those stitches to keep the leaf firmly attached to the clip instead of using glue. So as I sewed the detail on the front (top) of the leaf, I wound the needle through and around the clip, holding it in place.


Eventually the leaf was attached to the clip by my stitches and it had a nice detail on top.


Now all that is left, is putting it together!

I suppose I could have glued the rose to the leaf, but I decided to stitch it together.

I also did a few more stitches through the hole in the clip, for a little more reinforcement.

Now, the flower and leaf are all stitched together to the clip. But I think as a finishing touch, I will add a little glue over the stitches to give it a little extra reinforcement. And....next time I do this, I might wrap some ribbon over the top of the clip first, so you don't see as much of the metal clip. A small detail as you don't really see it.
And there you have it! A cute felt flower clip for a cute girl. She wasn't available to model this when I finished it, so here is a bad picture of the clip in my hair. Holy camera flash Batman!
It will TOTALLY be cuter on Delilah!
In other news.....I finished my camo dress! Well, I still have to sew the belt, but the dress itself is finished. And it fits! Well, sort of. I'll make some adjustments to the pattern for next time. I'll tell you all about that in an upcoming post.

Take care y'all!

Janimal


Fantabulous Friday!


Texas Monkey

Wednesday, February 2, 2011

Mullet Time!

Hello Friends,

Yesterday morning Delilah wore two garments that I sewed for her. Though they weren't made to go together, I think they looked adorable together. Unfortunately my picture just has Delilah sitting down, so it's tough to see the ensemble. But you get the idea.


Now, about Delilah's hair. It's soft, it's curly, it's lovely. Playing with her hair is one my life's greatest joys. At the moment it's at an odd length. It's not quite long enough to do a lot with, but it's
getting there - so while we wait out her hair growth......MULLET!

The dress (that is a dress all bunched up) has been on the blog before. The fabric is Metro Cafe by Robert Kaufman. The long bloomers are the softest City Weekend knit by Oliver and S. This knit fabric is SO soft and lovely. Fabrics purchased from Whipstitch Fabrics.


I'll be back soon with a new tutorial AND the completed camo dress! Woohoo!


Later skaters,

Janimal